Sunday, 31 May 2015

The Lost Child by Ann Troup


Hello Lovelies,

I've a book review for you today! I had the pleasure of reading Ann Troup's the Lost child and am taking part of a blog tour!


Thirty years ago, Mandy Millar, a very young three year old girl went missing - no trace of her was ever found. Fast forward to the present and Elaine Ellis takes a trip to Hallow's End to scatter her recently deceased mother's ashes in her childhood home whilst her kitchen and house are being re-fitted. Elaine soon meets quite a few of the locals including the full of life Miriam, one of the house keepers of Hallow's court and the young and the unceremoniously dumped Brodie who has grown up in the shadow of her missing sister, Mandy Millar. Elaine and Brodie soon make fast friends through being outsiders to the small village which leads them on the adventure of a life time as they try to find out what happened to poor little Mandy. 

You won't regret reading this, I binge read the whole thing during a busy weekend! Mystery, drama, suspense, thrills and even a little romance thrown in for good measure! I would very happily read this entire book again, it's just that good! You won't spot the twists and turns coming and they will keep you on the edge of your seat!! You just won't want to put this book down until you find out what happens at the end!

You can find the Lost Child on the Amazon kindle stores below:


Now Lovelies, the lovely Ann has decided to give everyone on the tour a £5 Amazon Gift voucher to give away! You can enter my give away using the rafflecopter below!

a Rafflecopter giveaway

Let me know your thoughts if you read it! I'd love to discuss it!

Ta-ta for now
X

Monday, 25 May 2015

Pasante - Genève laboratoire ~ Replen 10 Wrinkle Reducing Lip Masks ~*~Sponsored review ~*~

Hello Lovelies!


Today I have a sponsored review for you! Genève Laboratoire were kind enough to send me a box of their Replen 10 Wrinkle Reducing Lip Masks! These are normally £9.99 for three masks. Now, although I don't have many noticeable wrinkles yet, it is something that I am very keen on preventing in the coming years! 


The lip masks are anti-wrinkle and have a full and firming effect on lips. The box says 'Wrinkle reducing lip masks. clinically proven to reduce fine lines and wrinkles. a unquie collagen and hyaluronic formula developed by GENÈVE LABORATOIRE. REPLEN 10 is clinically proven to help you combat not only today's busy lifestyles but also the skins ageing process. REPLEN 10's advanced formula can also help reduce dark circles and bags, repair the skin after lengthy exposure to sun and achieve optimal levels of skin moisture' . This sounded great to me! I've been under a lot of stress recently and feel that my skin is probably suffering for it.


As the instructions said, I found myself 30 minutes in which to chill out and try out the masks! 


Firstly I washed my face to ensure my skin was super clean for the mask.


Opening the packet was very easy, the mask is almost jelly like which I wasn't expecting, and was a very nice surprise! It also smelt like roses which is one of my favourite scents, so this was a bonus too!


Application is super easy as the masks clings to your skin on contact. All I needed to do was press lightly to contour it to my lips. It's probably advisable to avoid talking whilst using this else you may find it comes unstuck.


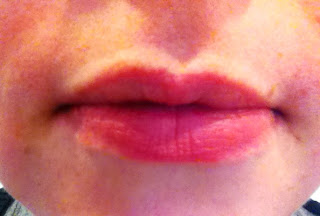
After 30 minutes I removed the mask! I did notice that my lips and surrounding skin was super soft and smooth and that my lips looked a lot fuller than before!


I'm really impressed with these and would love to have them as a regular part of my skin care routine - I'm very tempted to try out the rest of the Replen 10 range too!

You can find the lip masks here:
Replen 10 Lip Masks

Pasante also currently have an offer running - if you buy the collagen powder for £39.99 you get a set of eye, lip and face masks free too! 

You can find this offer here:
Replen 10 Collagen Powder offer

Ta-ta for now!
x

Monday, 18 May 2015

Happy Anniversary!

Hello Lovelies!

It's a special post today!

Two years ago today I married my best friend!
It doesn't really seem like it's been that long at all - I still remember very clearly making the wedding cake the week before and getting up super early to go to the hair dressers on the day and it definitely doesn't feel like two years ago!

Happy anniversary Mr Lock!

Ta-ta for now,
X

Friday, 15 May 2015

Stickers! Custom Nintendo 3DS XL!

Hello Lovelies!


Just a quick post today! I decided to update the decoration on my Nintendo 3DS XL. As you can see from above the older stickers weren't particularly interesting, and they were becoming grubby and scratched. The layout wasn't particularly good either.


So one by one I carefully peeled the stickers off. There was a little glue residue which I cleaned off with some surgical spirit - I avoided the camera lenses whilst doing this just in case it damaged them. I did debate leaving it looking super clean and plain... but this is me, and it's far too boring for my tastes!


So using the sticker I'd had in kawaii boxes and from Kirakirakawaisa to do this - I think it's pretty cute! It's definitely bright and eye catching. I think my favourite stickers the the sparkly kind.


I even put a few on the inside as well! I didn't do this last time but went for it this time round as I thought I could always remove them if I found them distracting. I really love the decoration on this now, it's definitely more me and the best thing is I can remove it in the future if I need to change the stickers or if I wanted to trade it in for the newer DS.

Ta-ta for now!
X

Monday, 11 May 2015

Little Twin Stars Necklace from KiraKiraKawaisa

Hello Lovelies!


I ordered a lovely necklace from KiraKiraKawaisa! I've a love for Little Twin Stars at the moment and fell in love with this necklace when I was browsing their store.


The parcel arrived super quickly, I just love how they decorate their boxes - I've re-used the stickers!


Inside was a little baggy with some free gifts, lots of shredded paper and confetti, and another little Rilakkuma baggy with my necklace in! These are so cute - I really love when stores put effort into their parcels and presentations.


Here's my necklace - I love the care and attention that has gone into making this - the chain is just perfect for this style as well.


A more detailed shot of the glittery resin and the Little Twin Stars decal.


I really like the rhinestones used here, they are almost iridescencent and sparkly in the light.


The back of the necklace - you could wear this back to front as it's so glittery for a plainer style.


Here are the little freebies I got! The note paper is so cute! I've already made use of the stickers too! I love this store so much and will definitely be buying more products in the future!

Ta-ta for now,
x


Saturday, 9 May 2015

Let's cook! Cinnamon buns!!

Hello Lovelies!


It's been awhile since we've had a Let's Cook! post - A friend of mine really wanted some Cinabons and I offered to make her these - she said they taste just like the ones from the shop! So I thought I'd share with you how to make some tasty cinnamon buns. Perfect for morning coffee and super easy to make, you can make these in no time at all!


You will need

For the dough
  • 250ml milk
  • 2 medium eggs
  • 75g butter, melted
  • 650g white bread flour + some for dusting
  • 1 teaspoon salt
  • 100g caster sugar
  • 1 Standard pack of yeast

For the filling

  • 225g dark brown soft sugar
  • 2 1/2 tablespoons ground cinnamon
  • 75g butter, soft enough to spread

For the icing

  • 200g (7 oz) icing sugar
  • 1/2 teaspoon vanilla essence
  • 2-3 tablespoons Water


Place all of the dry dough ingredients in a bowl and mix together.


Create a well in the centre.


Heat the milk up till it’s just warm - it needs to be warm to activate the yeast and which will make the dough rise, I put mine in a bowl in the microwave for about 30-40 seconds. Pour this into the well in the centre.

Melt the butter - again I used to microwave for about 30 seconds. When melted pour this in
with the milk.


 Crack the eggs into a separate bowl or jug and whisk with a fork, add these to the liquids.


Here comes the messy bit! Stir everything with a wooden spoon until you have something that looks like the above. Next you need to dust your hands with flour (To stop the wet dough sticking so much) and knead the dough until everything is blended properly.


Once it’s been kneaded it should like this. If you’re finding the dough is still a bit wet, add a little flour and knead it in.
  

Cover the bowl with a warm damp cloth, and leave it somewhere warm to rise for an hour.


The dough should have roughly doubled in size in the hour. Remove the wet cloth.


Grease and line a baking tray (Lining the tray will help with clean up later!)
  

Flour your surface that you are going to roll onto and dust the rolling pin with flour to prevent the dough from sticking.
  

Measure out the brown sugar and cinnamon and mix together.


Take your dough and roll out into a large rectangle. If you find it’s difficult to roll out try stretching it out to rough the shape you want.


Spread the dough with the butter quite thickly right to the edges


Sprinkle the cinnamon and sugar mix over the butter and flatten out with your hands - press it into the dough carefully.
  

Roll up the dough into a long sausage, tucking it under as you go. I found that it worked best to seal the edge with a little water.
  

Mark out 12 slices and using a sharp knife cut them.


Place in rows in the tray with enough room for the dough to expand in between them. Allow the buns to sit for half an hour. Whilst the dough is resting, pre-heat your oven to 200c.


After half and hour and when the oven is heated pop the buns into the oven for roughly 25 minutes - keep an eye on them, they are done once they have turned a golden brown colour. Whilst the buns are cooking, place either a sheet of grease proof paper or tin foil underneath a cooling rack - this will stop  any drips from syrup or icing from going onto your counter top.

Remove the buns from the oven once done, carefully use a knife to roughly cut out where the edges are, turn out on to the wire rack and separate each.
  

Mix up the icing sugar with the water and vanilla essence - you want it to be fairly runny.


Turn the buns up the right way and drizzle with the icing.


And that’s it! These are best served when warm but would make a tasty treat either way!

These are super easy to make so why not try it out yourself? Let me know how it goes in the comments!

Ta-ta for now
X